Friday, November 20, 2009

Spider Web Cookies


When my original plan for dessert at our formal Halloween dinner party failed, I had to come up with a new plan and fast! Enter the Amazing Bakerella. I found these cute cookies on her blog and decided to make them, but with peanut M&Ms to make my spiders. They turned out adorable :)

Spider Web Cookies
Serves 6 to 12 If you make sure your husband doesn't eat them all ahead of time.
You will need:
  • 1 package Betty Crocker Double Chocolate Chunk Cookie Mix
  • 1 can of chocolate ready-made frosting
  • 1 can of vanilla ready-made frosting
  • orange and green peanut M&Ms found in the bags for Halloween
  • Toothpicks
  • Resealable plastic bags
  • icing dye to tint white icing for the legs
  • black gel icing

Preheat oven to 350 degrees. Mix all ingredients for cookies as directed on the package. Use a medium sized cookie scoop or a large spoon to get similar sized cookies. You want to end up with about 12 cookies. Place the cookie dough on a baking sheet. Bake for about 7-8 minutes or until they are just set up in the middle. Transfer to a wire rack and cool completely.

After the cookies have cooled, spread chocolate frosting on the top of each cookie. Fill a resealable plastic bag with about half the vanilla icing. Snip a tiny hole (about the size of a toothpick) out of the bottom of one corner. Pipe on three concentric circles of white frosting for each cookie. Start in the middle with the smallest circle and work your way out (this way you don't drag through the icing). Take a toothpick and beginning in the center, drag it lightly through each circle. Repeat all the way around the cookie until you have formed your "web".

Place a green or orange M&M on each web where you want your spider to be.

Take the remaining white frosting and separate it into two bowls. Tint one frosting with orange icing color and the other with green. This takes a bit of guessing to get the color you want. Just remember that a tiny bit of icing tint goes a LONG ways. :) Fill two resealable bags with the orange and green frosting and snip off a teeny tiny corner of each. Pipe eight small legs of the coordinating color around each M&M. Use black gel icing to add eyes to your spiders. Enjoy this spooky treat!
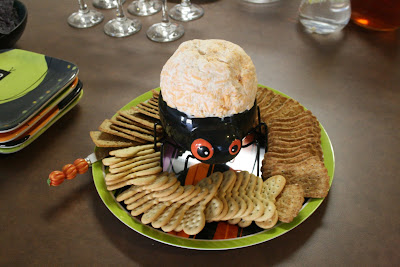
Cheese ball


My mom is the queen of winging it and using what she has to make delicious foods. This cheese ball is her recipe and is very delicious. Some would say that my family is famous for making this for holidays and parties. It is very delicious!

Cheese ball
You will need:
  • 1 - 8 oz block of cream cheese, softened
  • 2 cups finely shredded cheddar cheese
  • 1/2 an onion finely chopped (more or less depending on how strong of an onion it is)
  • 1 to 2 cloves garlic, minced
  • 1/2 to 1 tsp Worcestershire sauce
  • Assorted crackers

Using your hands or two spoons, mix together the cream cheese, garlic, onion and Worcestershire sauce. After it is thoroughly mixed slowly mix in the shredded cheese, about a 1/2 cup at a time. If you put it all in at once it will not distribute evenly. Form into a ball, cover and chill for at least an hour. The longer it sits (say overnight) the better married the flavors will be. Enjoy!

Chewy Pizza Bread


This is a quick and easy pizza to make in the summer when you have loads of fresh basil on hand. It is also tasty in the cooler months, but the fresh basil is the best! This is modified from Betty Crocker.

Chewy Pizza Bread
Serves 4
You will need:
  • 1 1/2 cups flour
  • 1 1/2 tsp baking powder
  • 1/2 tsp salt
  • 3/4 cup beer (regular or non alcoholic)
  • 1/2 cup tomato pasta sauce
  • 1/2 tsp Italian Seasoning
  • 1/2 cup shredded mozzarella cheese
  • chopped fresh basil leaves

Preheat the oven to 425 degrees F. Spray an 8x8 baking pan with cooking spray. In a medium bowl, stir together flour, baking powder, and salt. Stir in beer just until the flour is moistened. Spread the dough evenly in the pan.

Stir the Italian seasoning into the tomato pasta sauce. Spread the sauce over the dough. Sprinkle with cheese.

Bake for 15 to 20 minutes or until toothpick comes out of the center clean. Sprinkle basil over the top. Slice and serve warm!

Thursday, November 12, 2009

Apple Chipotle Pork Burritos with Chipotle Sauce


These pictures SO don't do this meal justice because it is FABULOUS and my photography skills aren't so much...

Anyway these burritos are really good and really easy to make. The burrito recipe comes from Gourmet Sleuth. The proportions I'm giving are for a single batch that makes about 4 small burritos; I personally have only made a double or larger batch.

Makes 4 burritos.
You will need:
  • 1/2 cup plain yogurt
  • 1/2 cup mayonnaise
  • 2 teaspoons pureed chipotle peppers in adobo sauce
  • 1/4 pound pork loin, cut in small squares
  • 4 tablespoons olive oil
  • 2 apples, peeled
  • 1 onion, chopped
  • 2 garlic cloves, chopped
  • 6 tablespoons cilantro, chopped

Step 1: Adobo Sauce
To prepare sauce, in a small bowl, mix together the yogurt, mayonnaise, and chipotle peppers until smooth. You can add more adobo and peppers to taste. Chill until serving.
(I've included a picture of the can for the chipotle peppers since this isn't a standard item. This can be found in the Mexican Food section at most grocery stores.)


Step 2:
Heat oil* in a frying pan and fry pork until slightly golden . Remove pork and soak oil using paper towels. Add apple, onion and garlic to the frying pan and cook until glazed for 3 minutes.
*(You do not need additional oil if you increase the proportions of this recipe)

Step 3: In a bowl, combine pork mixture, add cilantro with 4 tablespoons of chipotle sauce so that it does not dry out.


Step 4: Heat tortillas on a flat griddle and fill each tortilla with one tablespoon of cooked pork at a time until the tortilla is half full. Fold both ends and roll the tortilla. You can serve these with the chipotle sauce on the side as well :)

This Adobo Sauce is also very good with other items like chicken, chili or other items that could benefit from a gentle spicy kick!

Monday, October 26, 2009

Michelle's Artichoke Dip


It is really hard to find a good artichoke dip recipe. Several recipes that I have tried have been too thick or too bland. This recipe was given to me by my sister, Michelle. It is so delicious that you will have a hard time not eating the whole pan by yourself!

I served this up during cocktail hour at our recent Halloween dinner. Enjoy!

Artichoke Dip
Serves 1 to 6 :)
You will need:
  • 1 can (14 oz) Artichoke hearts, drained and finely chopped
  • 1 pkg (10 oz) frozen chopped spinach, thawed and drained*
  • 3/4 c Parmesan cheese
  • 3/4 c mayonnaise
  • 1/2 c shredded mozzarella cheese
  • 1 clove garlic, minced

*To thaw and drain the spinach - unwrap frozen spinach and place in a strainer. Run cold water over it until it completely thaws. Press on spinach to drain extra water. Place spinach on a towel or paper towels and roll in the towel to absorb excess water.

Preheat oven to 350. Stir all ingredients together in a medium bowl. Spoon into 9 inch pie plate or an 8x8 baking dish. Bake 20 minutes or until heated through.

If you want the cheese to be golden on top, put under the broiler for a minute or two. Keep an eye on it so it doesn't burn!

Serve with crackers or tortilla chips. I love the blue corn tortilla chips we served it with!

Thursday, September 10, 2009

Quick, Cheap & Easy Pad Thai


This is a quick and cheap way to make a version of Pad Thai. I almost always have these items on hand which makes it even better!

No meal complete without meat? Stick around after the recipe.

Pad Thai
2 servings
You will need:
  • 2 packages Maruchan ramen (doesn't matter what flavor, you won't be using the seasoning)
  • 3 green onions, thinly sliced
  • 2 to 3 T creamy peanut butter (I use Jif reduced fat)
  • 1 clove garlic, minced
  • 1/4 cup freshly squeezed lime juice.
  • Zest of one lime
  • 1/4 tsp chili powder
  • dash of crushed red pepper flakes (optional)
  • 2 tsp freshly chopped cilantro (optional)

In a 2 quart saucepan, boil 3 cups water. Add in the ramen noodles (don't add seasoning!). Cook for two minutes then drain. Set noodles aside. Return saucepan to stove. Over low heat, melt peanut butter, stirring constantly. You want to get it to this consistency:
Once you get it all melted and creamy stir in lime juice. Stir until well combined. Sauce will become thicker. Stir in garlic, chili powder, lime zest and red pepper flakes if desired. Add ramen back to the pan. Toss noodles until coated. Serve into bowls and top with green onion and cilantro if desired.

Need meat? grab one pound unbreaded chicken breast tenders and two eggs. Cut the tenders in half crosswise. Beat the eggs in a bowl. Cook the chicken in a bit of oil in a skillet preheated over medium-high heat, 4 or 5 minutes until browned. Stir in eggs. Stir for 2 to 3 minutes or until eggs are cooked. Serve in your Pad Thai!

Stove-Top Lasagna


Love lasagna, but hate how long it takes? Tired of the same old boring spaghetti? Looking for a quick delicious way to get in your veggies? Look no more! This is a dish modified from good old Betty Crocker. If you don't have the Quick & Easy cookbook (30 minutes or less), you should run out and buy it. This dish is super fast and easy. What could be better than that you say? Well, I will tell you. It only takes one pan! Hooray.
For those of you interested in a vegetarian option, you can substitute Morning Stars' new Italian Sausages.
Stove-Top Lasagna
4 to 8 servings
You will need:
  • 1 pound bulk sausage (I use hot and spicy, but you can also use Italian)
  • 1 green pepper, sliced
  • 1 red pepper, sliced
  • 1 package (8 oz.) sliced mushrooms (I prefer baby bellas, they cook better)
  • 1 medium onion, chopped
  • 3 cups uncooked pasta (this time I used skinny lasagna noodles and broke them up. You just want something a little bit hearty. Things like elbows or shells will just break apart)
  • 2 1/2 cups water
  • 1/2 tsp Italian seasoning
  • 1/2 tsp crushed red pepper flakes (optional)
  • 1 jar (26 to 30oz.) chunky tomato sauce
  • 1 1/2 to 2 cups Italian blend cheese or Mozzarella

Cook sausage and onions in a DEEP 12 inch skillet or a 4 quart Dutch oven over medium high heat. Stir occasionally, until sausage is no longer pink. Stir in peppers and mushrooms. Let cook until peppers start to soften and mushrooms start to cook.

Stir in remaining ingredients, except cheese. Heat until boiling, stirring occasionally. Reduce heat, simmer uncovered for 10 minutes or until pasta is tender. Turn of heat. Stir in 1/2 cup to 1 cup cheese. Top with remaining cheese.

Saturday, August 29, 2009

Italian Stuffed Shells


One of my friends made this for a dinner for a large group of is and it was fabulous. I've since made it on my own and am surprised at how easy and DELICIOUS it is :)

6-8 servings
You will need:
  • 1 jar favorite spaghetti sauce (I recommend 2 but I LOVE sauce)
  • 1 pkg jumbo shells
  • 1 lb Italian sausage
  • 1 ½ tsp Italian seasoning (this is what the recipe calls for but instead I like to chop up a couple leaves of fresh basil and parsley, then just add dried oregano)
  • 15-16 oz ricotta cheese
  • 2 cups shredded mozzarella
  • ½ cup grated Parmesan
  • 2 eggs
  • Garlic salt & pepper (there is no measurement on the recipe I have, I usually just put probably about ½ tsp of pepper and use fresh or pre-chopped garlic instead of garlic salt)

Cook shells, set in cold water until ready to use. Drain and dry with a paper towel just before stuffing

Stuffing:
Cook the Italian sausage and try to break it into small crumbles. Mix in a large bowl Italian sausage, ricotta, ¾ of the mozzarella, Parmesan, eggs, seasonings, (other additional options: chopped onion, spinach, meat other than sausage, chicken does NOT work well unless you really season it, it can be pretty bland)

Coat the bottom of a 13x9 baking dish with a thin coat of spaghetti sauce to prevent sticking. Stuff shells with cheese mixture as full as you can get them and arrange in dish. After all the mixture is used (you usually don’t use all the shells) coat the shells with the remaining sauce. Top with remaining mozzarella. Cover with foil and bake at 350 for 20 minutes or until heated all the way through. Uncover and let stand 5 minutes before serving.

Friday, July 31, 2009

Toasted Ravioli


Sorry it has taken me so long to actually post this! First I had to decipher the notes my husband made after he had made these a third time. Then I got busy making invitations and programs for my sister's wedding. I should actually be packing for said wedding now, but I didn't want to leave you hanging any longer.
Toasted Ravioli is one of my favorite foods. I was rather bummed when I learned they are endemic to the St. Louis area and I can't find a good one in Austin. So I was very surprised, when I went away for a trip, to return to delicious homemade toasted ravioli made by my husband. Yum!

Toasted Ravioli
Serves 4 to 6
You will need:
For the Dough
  • 1 1/2 cups all purpose flour
  • 1 egg
  • 1 egg yolk
  • 1 tsp salt
  • 2 to 4 T water
  • 1 T olive oil

For the filling:

  • 1/2 pound pork sausage (we used spicy sausage)
  • 2 T olive oil
  • 1/2 small zucchini, finely diced
  • 1/2 yellow squash, finely diced
  • 2 cloves of garlic, minced
  • 2 to 3 large cremini mushrooms, chopped
  • 2 tsp Italian seasoning (more or less to taste)
  • 4 oz cream cheese
  • 2 T mozzarella

For the breading

  • 2 eggs
  • milk
  • bread crumbs (plain or Italian)

To make the dough, mound flour and salt on a clean flat work space. Make a hole in the top of the mound (like a volcano). Add to the hole egg, egg white and 2 T of water. Mix dough together with hands. If the dough is not sticky enough to stay together, add more water a tablespoon at a time. Do not over work dough.

Roll dough out with a rolling pin (on a floured work surface) until desired, even thickness. Or use a pasta roller set on 6 :) Set dough aside while you make the filling.

To make the filling. Brown the sausage over medium heat in a large skillet, until no longer pink. Add in veggies and garlic and let simmer for 1 minute. Add in the mushrooms and Italian seasoning and let cook for 1 minute. Add in the cream cheese and mozzarella. Stir until all the cheese is melted and well blended. Remove from heat and let cool slightly.

Cut dough into desired sized rectangles. Place filling on one side on the rectangle, mounding so it is not near the edges. Using your finger, rub some water along the edges of the rectangle that filling is on. Fold the half of the rectangle that does not contain filling over the side with filling. Press the edges firmly to seal them shut. Do this to all remaining rectangles until you run out of dough or filling.

Next mix together 2 eggs and a splash of milk. Place bread crumbs in a clean shallow bowl. Dunk raviolis in the egg wash and then into the bread crumbs. Be sure to flip the raviolis over several times in the bread crumbs to make sure they are well coated. Place coated raviolis on a plate.

The final step can be done one of two ways, fry in oil or bake.

To fry - Fill a 12 inch skillet with 1/2 an inch of vegetable oil. Heat over medium high. Once the oil is hot enough, place a few raviolis at a time into the oil. Turn after 30 seconds or when golden brown. Remove to paper towels.

If frying isn't your thing - Preheat oven to 350. Spray a cookie sheet with Pam or other cooking spray. Place the raviolis on the cookie sheet in a single layer. Spray the raviolis with Pam as well. Bake for 10 minutes. Flip over raviolis. Bake for another 5 to 10 minutes or until warmed through.

Both ways are tasty! Serve immediately with your favorite marinara sauce and Parmesan cheese. Leftovers can be refrigerated.

Monday, June 29, 2009

Toasted Ravioli


Recipe coming soon...

Tuesday, June 23, 2009

Buffalo Chicken Nuggets


This recipe is quite possibly one of my new favorites. I LOVE buffalo nuggets, but I hate that they are fried at restaurants and if you buy them frozen they usually are dark meat or really salty. This recipe is BAKED and oh so delicious! This is adapted from Betty Crocker.

Buffalo Chicken Nuggets
Serves 4
You will need:
  • 1 1/2 cups corn Chex
  • 1/2 cup Bisquick
  • 2 tsp paprika
  • 1/4 tsp seasoned salt (mix together equal parts salt, garlic powder and ground mustard)
  • 1/4 tsp ground cayenne
  • 1 T vegetable oil
  • 1 tsp hot sauce (Tabasco)
  • 1 lb chicken breasts, cut into 2 inch pieces
  • Blue cheese dressing for serving
  • celery for serving

Preheat oven to 425 degrees. In a one gallon storage bag, crush chex. A rolling pin, can, or your hands will work just fine. Add Bisquick, paprika, seasoned salt, and cayenne to cereal. Mix well.

In a small bowl, mix together oil and hot sauce. Coat chicken pieces with oil mixture.

Shake 5 or 6 pieces at a time in cereal bag, until well coated. Shake off any excess mixture. Place nuggets on an ungreased baking sheet in a single layer.

Bake about 10 minutes or until chicken is no longer pink in the center. Serve with blue cheese dressing and celery sticks. YUM!

Shower Punch


I made this super tasty punch for my sister's bridal shower. Yum!

Pink Punch
Serves 20 people who love punch
You will need:
  • 4 cans peach nectar
  • 2 - 2 liter bottles of ginger ale
  • grenadine
  • raspberries and blueberries for garnish
  • umbrellas for garnish

Chill peach nectar and ginger ale for a few hours before the shower. In a large punch bowl, add peach nectar. Add in grenadine until punch is a dark pink color. Stir well. Slowly pour in the ginger ale (don't go fast or you will lose your fizz). If the punch isn't pink enough for you, pour in more grenadine. Refrigerate punch until ready to serve. Garnish umbrellas with fruit to serve in the glasses. Yum!

Wednesday, May 20, 2009

Stuffed Taco Shells


These stuffed taco shells are a nice way to change up how you eat tacos or pasta. They are super easy to make and leftovers keep well. I have even taken them to book club where they were a hit!

Stuffed Taco Shells
Makes 12 to 16 shells
You will need:
  • 1/2 pound lean ground beef
  • 1/2 package of taco seasoning
  • 1 can of black beans, drained and rinsed
  • 4 oz. regular cream cheese
  • 12 to 16 large pasta shells (I often throw in a few more to boil in case some tear)
  • 1 cup salsa
  • 1 cup taco sauce
  • 1 cup of shredded sharp cheddar cheese
  • 1 cup of shredded Monterey jack cheese
  • 3 green onions thinly sliced
  • crushed tortilla chips (I use blue corn tortilla chips)
  • 1 cup sour cream (optional)

In a skillet, brown ground beef (season beef as you would normally). Add in the taco seasoning and prepare as directed on the package. Add in the cream cheese and stir until melted. Stir in the black beans. Set aside to fully cool. While ground beef is browning, cook pasta shells according to directions. Drain and toss with butter. Allow to full cool.

After meat mixture and shells have cooled, preheat the oven to 350 degrees. Line a 9x13 baking dish with foil. Pour salsa in the bottom of the dish, spreading evenly. Stuff each shell with meat mixture and place in the pan on top of the salsa. Top each stuffed shell with taco sauce.

Bake uncovered for 25 minutes. After 25 minutes sprinkle with cheese, green onions, and chips. Cook for another 10 to 15 minutes or until cheese is fully melted. Serve with sour cream.

Monday, May 18, 2009

Thin Mint Cookies


Thin Mints are by far the best Girl Scout Cookie. Those little girls sure know how to make you crave a cookie. I mean you can only get them during a small window every year. Well I have found a recipe for thin mint cookies that comes close to the real thing.

Thin Mint Cookies
You will need:
  • 1 box of Devil's Food Cake Mix
  • 2 eggs
  • 2 T of water
  • 2 T of vegetable oil
  • 1/2 cup of cocoa (powder)
  • 1 package of chocolate chips
  • 2 to 3 drops of Wilton's Candy Mint Flavoring


Preheat the oven to 400 degrees. In a bowl, mix the eggs, water, cooking oil, cake mix, and cocoa powder. Mix until well blended. Cover and place aside for 20 minutes. On an ungreased cookie sheet make 1/2 inch small balls of the mixture. Place them on the cookie sheet about 2 inches apart from each other. Spray a large spoon with PAM or any kind of non-stick cooking spray. Use the spoon on the balls to make them flat. Place the cookie sheet in the oven for about 8 minutes. Set aside for them to cool down to room temperature.

Get another bowl and melt the chocolate chips in the microwave. You can also melt them in a double boiler over the range. Gently drop the mint flavoring into the melted chocolate. Be aware that the flavoring is powerful, so watch the amount of drops. Pour or spread the chocolate onto the cooled cookies. You can use a brush or the bottom of a spoon to help spread it evenly. If you want a different way to have thin mints, dip the cookies into the chocolate.

Sunday, April 26, 2009

Pulled Pork Sandwiches with Strawberry BBQ Sauce


This is a nice summery version of pulled pork sandwiches.

Pulled Pork with Strawberry BBQ Sauce
Serves 6
You will need:
  • a 2 to 2 1/2 pound boneless pork shoulder roast
  • 2 cups strawberries, halved
  • 1/2 cup ketchup
  • 1/4 cup cider vinegar
  • 4 cloves garlic, minced
  • 1 tsp dried rosemary
  • 2 T honey
  • 1 tsp crushed red pepper flakes
  • salt
  • pepper
  • Rolls or buns

Trim fat from pork. Place roast in a crock pot. Sprinkle roast with salt and pepper. Add half the strawberries, ketchup, vinegar, garlic and rosemary to the crock pot. Add half the red pepper flakes. Cook on high for 4 to 5 hours or until pork is tender and shreds apart. Remove roast from crock pot. Shred pork apart using two forks, discarding fat.

To make the BBQ sauce: Skim fat off of cooking liquid. Add liquid to a medium skillet. Bring liquid to a boil and simmer for 8 minutes or until thickened. Stir half of the liquid back into the shredded pork. In the remaining half in the skillet and the remaining strawberries and pepper flakes. Stir in the honey.

Serve the pork on buns. Top with additional sauce and cheese if desired.

Parmesan-Stuffed Chicken and Melted Strawberries


Another wonderful strawberry recipe modified from Better Homes and Gardens.

Parmesan-Stuffed Chicken and Melted Strawberries
Makes 2 servings
You will need:
  • 2 chicken breasts
  • 1 1/2 cups fresh strawberries (halve large berries)
  • 1 T white balsamic vinegar
  • 1/4 strawberry jam **
  • 1/2 cup shredded Parmesan cheese
  • 2 large basil leaves
  • 1 T olive oil
  • 2 cloves of garlic, minced
  • snipped basil for topping
  • pepper
  • salt

Heat oven to 400 degrees. In a baking dish combine strawberries, vinegar, and jam. Sprinkle with salt and pepper. Set aside.

Cut a horizontal pocket into each chicken breast. Do so by cutting from one side almost, but not through, to the other side. Place a basil leaf into each pocket. Stuff pockets with Parmesan cheese. Secure pockets closed with wooden toothpicks. Sprinkle with pepper.

In a 12 inch oven-safe grill pan or skillet, cook garlic in oil over medium heat for 30 seconds. Add chicken and cook five minutes or until golden, turning once. Transfer to the oven. Bake, uncovered, 5 minutes. Add baking dish with the strawberries to the oven. Bake for 10 to 13 minutes, or until chicken is no longer pink and the berries have softened. Serve chicken with melted strawberries. Sprinkle with basil.

Stawberry & Cheese Bruschetta


Strawberries are in season right now. You know what that means, tons of strawberries to cook with! Better Homes and Gardens May 2009 issue has lots of ideas. Of course I can never let a recipe be, so the strawberry posts will all be my rendition.

Strawberry & Cheese Bruschetta
Makes 6 slices
You will need:
  • 1 baguette
  • 1 T olive oil
  • 4 oz. Sage Derby cheese
  • 1 1/2 cups sliced strawberries
  • 1/2 cup arugula
  • Basil finely sliced
  • sea salt
  • freshly ground pepper

Heat the broiler. Cut baguette in half lengthwise, then into thirds crosswise. Place cut sides up on a large cookie sheet. Brush bread with the 1 T of olive oil. Broil for 1 1/2 to minutes 3 to 4 inches from heat or until lightly toasted. Slice and divide the cheese among the bread slices. Top with sliced strawberries. Broil 2 to 3 minutes or until cheese is melted and berries have softened. Remove from broiler, top with arugula and basil. Drizzle additional oil if desired. Sprinkle with salt and pepper.

Saturday, April 25, 2009

Corn and Avocado Salad


Google Reader started suggesting blogs for me to read. I find this a little bit creepy, but when bored I will wander. It led me to http://ashleescooking.blogspot.com She has lots of great stuff posted and what is really creepy, she is from my hometown area. How does Google know!? Any who, I thought I would try out this tasty side with a few changes.

Corn and Avocado Salad
You will need:
  • 1 cup frozen corn kernels, thawed
  • 1 ripe avocado diced (I made my pieces fairly large so they don't mush completely when you mix it)
  • 1/4 red onion, minced
  • 1 T minced cilantro (Stephanie I think you could skip this and add more lime)
  • 1 jalapeno, seeded and minced
  • Juice of one fresh lime (two limes if they are tiny)
  • salt
  • pepper

Add corn, red onion, cilantro, jalapeno, lime juice, salt and pepper into a bowl. Mix well. Add avocado by folding in gently. Again bigger pieces are good for keeping shape. Chill until ready to serve. For storing leftovers, place saran wrap flush with salad.

Grandma Mather's Potato Salad


My grandma made one of the BEST potato salads! I was fortunate enough to make this with her and have the recipe before she passed away. Nothing says summer like a good potato salad.

Grandma Mather's Potato Salad
Serves 6
You will need:
  • 5 to 8 red potatoes
  • 1 hard boiled egg
  • 1/2 yellow onion
  • 1 T sweet relish
  • 1/4 cup chopped celery
  • 1 cup mayonnaise**
  • 1 T yellow mustard
  • 1/4 tsp celery seed
  • Dash of Worcestershire sauce
  • Dash of garlic powder
  • Pepper to taste

Boil the potatoes unpeeled for 30 minutes, covered, or until jackets crack open. (see photo)
Drain potatoes and rinse in cold water. Once potatoes have cooled, peel off jackets and cube potatoes to desired size. Put potato cubes into serving bowl. Peel and cut hard boiled egg. Add egg and chopped celery to the bowl with potatoes. In a separate bowl, mix mustard into mayo. Add Worcestershire sauce, garlic powder, pepper, and celery seed to the mustard/mayo mix. Stir mixture into potatoes. Add more garlic powder and pepper to taste. Chill before serving.

**Last time I made this I only had Miracle Whip on hand. If you are going to substitute Miracle Whip for mayo you need to add more relish to counteract the tangy zip of the miracle whip.

Friday, April 3, 2009

Wordle


There is this really cool website called www.wordle.net You can enter a bunch of words or copy in a website or blog and it makes this word cloud. I thought it was really cool so I tried it out with the food blog! Try making yours :)

Saturday, March 21, 2009

Parmesan-Crusted Broiled Scallops with Roasted Tomatoes


Since I finally had an evening at home I decided to indulge myself and cook a really fun meal. This ended up being so much easier than I had expected. And it was delicious...but I'm probably partial because I love scallops :)

You will need
For the Scallops:

  • 1/3 cup Italian bread crumbs
  • 1 tablespoon grated Parmesan cheese
  • 1 tablespoon minced fresh parsley
  • 1/4 teaspoon pepper
  • 1 1/2 pounds sea scallops
  • 1 tablespoon margarine, melted
  • Cooking spray
For the Tomatoes:
  • 3 cups grape tomatoes
  • 1 tablespoon olive oil
  • 1/4 teaspoon salt
  • 1/4 teaspoon pepper
Steps:
1) Preheat broiler.
2) Combine first 5 ingredients in a bowl; set aside. Brush scallops with margarine. Add scallops to bowl and toss to coat.
3) Place scallops on a broiler pan coated with cooking spray.

4) Place tomatoes in a bowl and add olive oil, salt and pepper; toss well to coat.

5) Place tomatoes on other half of broiler pan also coated with cooking spray.

6) Broil together for 10 minutes. For the scallops, broil until done (slightly firm). For the tomatoes, broil until they begin to brown, stirring occasionally.

Mexican Chocolate Souffles


When cooking with some of my friends from work we decided to attempt to tackle making our own souffle. Believe it our not (I still have a hard time) it turned out REALLY well. This was the first time I'd ever tried a souffle so I don't know how it was in comparison to others but I thought it was wonderful; light, fluffy, yet still satisfying my ever present chocolate craving ;)

Yields 8 ramekins. (We obviously did not have the correct number of ramekins but we made due ;)

You will need:
  • Cooking spray
  • 3 tablespoons granulated sugar
  • 1/2 cup granulated sugar
  • 1/4 cup unsweetened cocoa
  • 2 tablespoons all-purpose flour
  • 1 teaspoon ground cinnamon
  • 1/8 teaspoon salt
  • 1/8 teaspoon ground red pepper (optional)
  • 3/4 cup fat-free milk
  • 3 ounces bittersweet chocolate, chopped
  • 1 teaspoon vanilla extract
  • 1 teaspoon coffee-flavored liqueur (such as Kahlúa)
  • 1 large egg yolk 1/4 teaspoon cream of tartar
  • 6 large egg whites
  • 2 tablespoons granulated sugar
  • Powdered sugar (optional)

Steps:
1) Preheat oven to 375°.
2) Coat 8 (6-ounce) ramekins with cooking spray; sprinkle with 3 tablespoons granulated sugar.
3) Combine 1/2 cup granulated sugar, cocoa, flour, cinnamon, salt, and pepper, if desired, in a medium saucepan. Gradually add milk, stirring with a whisk until smooth. Bring to a boil over medium-high heat; cook 1 minute, stirring constantly. Remove from heat; add chocolate, stirring with a whisk until smooth. Place chocolate mixture in a large bowl; stir in vanilla, liqueur, and egg yolk.
4) Place the cream of tartar and egg whites in another large bowl; beat with a mixer at high speed until foamy. Add 2 tablespoons granulated sugar, 1 tablespoon at a time, beating until stiff peaks form. Gently stir one-third of egg white mixture into chocolate mixture; gently fold in remaining egg white mixture. Spoon evenly into ramekins; sharply tap ramekins 2 or 3 times on counter to level. Place ramekins on a baking sheet.
5) Bake at 375° for 30 minutes or until puffy and set. Sprinkle with powdered sugar, if desired. Serve immediately.

Avocado Salsa


This is a really simple recipe that is absolutely fabulous (Sorry that the picture isn't the best)! Especially when served with Lime flavored chips :) I forgot how much I missed avocado until a recent trip to Mexico. When I got home I HAD to make this :) Bonus, it's from Cooking Light...ENJOY!

You will need:
  • 2 cups finely chopped onion
  • 3/4 cup finely chopped red bell pepper (1 small)
  • 3 tablespoons finely chopped seeded jalapeño pepper
  • 3 tablespoons extravirgin olive oil
  • 3 tablespoons white wine vinegar
  • 1 teaspoon Dijon mustard
  • 3/4 teaspoon sea salt
  • 1/4 teaspoon freshly ground black pepper
  • 1 large garlic clove, minced
  • 1 1/2 cups chopped peeled avocado (about 2)
  • 1/2 cups chopped seeded plum tomato (about 1 pound)
  • 2 tablespoons chopped fresh cilantro
  • 1/4 teaspoon hot pepper sauce
(I recommend adding a little more vinegar ~1 Tablespoon or so and possibly a little more hot pepper sauce.)

Steps:
1) Combine first 9 ingredients in a large bowl; toss mixture gently. Cover and refrigerate 3 hours.


2) Stir in avocado and remaining ingredients just before serving.

Friday, March 6, 2009

Stuffed Bell Peppers


Mmm, stuffed green bell peppers. They are a perfect food regardless of season. They are a meal all by themselves. So why in the world have I not made them before? The answer is simple, my husband. He is very specific requirements when it comes to stuffed peppers. The beef can not be the majority of ingredient. The pepper still needs to be a bit crispy. There needs to be mushrooms in them...and so on and so on. So I took a recipe from my friend A and modified it. I liked that her peppers were not boiled first and that she used tomato sauce instead of spaghetti sauce. So here goes...

Stuffed Green Bell Peppers
Makes 4 peppers
You will need:
  • 4 medium to large green bell peppers, tops and seeds removed
  • 1/2 lb of ground beef
  • 1/2 yellow onion, chopped
  • 1 to 2 T minced garlic
  • 1 cup plus 1/4 cup mozzarella cheese
  • 2 cups cooked rice (I use one "boil in the bag" bag of rice)
  • 1 8oz can of tomato sauce
  • 6 large cremini mushrooms, chopped

Preheat oven to 350 degrees. Prepare rice as directed on package. Meanwhile, in a large skillet add onion and ground beef. Cook over medium until the beef is browned and the onions are translucent. Add in the mushrooms. Cook for 2 to 3 minutes or until the mushrooms release their moisture. Remove from heat. Drain the rice and add to the filling mixture. Stir in 2oz of the tomato sauce and 1/4 cup of mozzarella cheese.

Place the bell peppers in an 8X8 baking dish, it is the perfect size for four peppers. Make sure that tops, seeds and white flesh are removed. fill each pepper with the meat mixture. Pour remaining tomato sauce over the filled peppers. Bake for 45 minutes. Remove baking dish and top peppers with remaining mozzarella. Bake for 15 more minutes or until cheese begins to brown.

Next time I am going to try A's suggestion of adding some Italian sausage to the mixture. I think it will taste fabulous.

Monday, March 2, 2009

Taco Cups


While I was visiting my family for Christmas we had Rachel Ray's tasty BBQ beef cups. I decided to try and do something similar, but with a taco twist. They are so easy to make and a nice break from regular ol' tacos.

Taco Cups
Makes 5 cups
You will Need:
  • 1/4 lb. ground beef
  • 4T taco seasoning
  • 1/4 cup water
  • 1 short tube of refrigerated biscuits (5 in a tube)
  • 1/2 to 1 cup cheddar cheese or Mexican cheese blend
  • Sour cream
  • Taco sauce

Preheat the oven as directed on the tube of biscuits. In a medium skillet season your beef as normal and cook until no longer pink. I season my meat with some pepper, onion flakes, garlic powder and crushed red pepper flakes. After the meat is completely cooked, add in taco seasoning and water (you can add more taco seasoning to taste). Stir well and let simmer until the liquid is cooked off. Remove from heat.

For the next step grease 5 muffin cups of your muffin pan (no need to grease if you are using silicone). Place a biscuit into each greased muffin cup. Make sure the biscuit touches the bottom and stretch the dough up the sides. Then fill each cup with the beef mixture and top with the desired amount of cheese. Bake for 10 to 12 minutes or until biscuits are golden. Let cool for 2 minutes. Slide biscuits out of muffin cups. Top with taco sauce and a dollop of sour cream. Enjoy!

Monday, February 23, 2009

Pulled Pork Tacos


Pulled pork tacos are so tender and tasty. This recipe is so simple to make because you throw all the stuff in the crock pot and a couple hours later you have moist pork for tasty tacos. This meal goes great with a hard cider. I personally love Hornsbys.

Pulled Pork Tacos
Serves 6 to 8
You will need:
  • 2 cups salsa
  • 2 T chili powder
  • 2 T dried oregano
  • 2 T unsweetened cocoa powder
  • 1/2 tsp salt
  • 1 1/2 to 2 pounds of boneless pork shoulder, trimmed of excess fat

For serving:

  • salsa
  • fresh cilantro
  • green onion
  • lime wedges
  • sour cream
  • cheddar cheese

In a 4 to 6 quart crock pot, combine the salsa, chili powder, oregano, cocoa and salt. Add the pork and turn to coat. Cook, covered, until the meat is tender and shreds with a fork, high for 4 to 5 hours or low for 7 to 8 hours. Warm tortillas before serving. Shred apart the pork and stir into the cooking liquid. Serve with salsa, cilantro, green onion, lime wedges, sour cream and cheddar cheese. Enjoy!

Cranberry Chocolate Oat Bars


These bars are so delicious that they are guaranteed to not last more then two days around your house. They make a great dessert and a sweet breakfast treat. Yum!

Cranberry Chocolate Oat Bars
You will need:
  • 1 1/2 cups flour
  • 1 1/2 cups quick baking oats
  • 1 tsp baking soda
  • 1/2 tsp ground cinnamon
  • 1/2 tsp salt
  • 3/4 cup margarine, softened
  • 1 1/3 cups packed brown sugar
  • 2 eggs, beaten
  • 1 cup semi-sweet chocolate chips, divided
  • 2/3 cup craisens, divided
  • 1/2 cup chopped nuts (optional)

Preheat oven to 350 degrees. Spray a 9x13 baking pan with cooking spray. Combine flour, oats, baking soda, cinnamon and salt in a medium bowl. Set aside. Beat margarine and sugar until creamy and smooth in a large bowl. Add eggs one at a time and beat until well blended. Slowly stir in the flour mixture, 1/2 cup of chocolate chips and 1/3 cup of craisens. Continue stirring until well blended. Spread dough into prepared pan. Sprinkle evenly with remaining craisens, chocolate chips and nuts (if desired). Bake for 28 to 32 minutes or until a deep golden brown.

Monday, February 16, 2009

Cheese Fondue (fancy swiss)


This fondue is a very Delicious Swiss based fondue. It is a recipe I came up with after finding that several just weren't quite right. This fondue takes about ten to 15 minutes to make, but requires slightly nicer cheese than is found in a bag of Kraft. Most grocery stores should have these types of cheeses. If not, move to a bigger city ;)

Fancy Swiss Cheese Fondue
Serves 4
You will need:
  • 1 clove of garlic, halved
  • 6 tablespoons butter
  • 3 tablespoons all purpose flour
  • ¼ cup Sherry
  • 1 cup whole milk
  • 3 ounces Emmenthaler cheese or any type of Swiss, cubed
  • 3 ounces Gruyère cheese, cubed
  • 3 ounces Raclette cheese, cubed
  • 3 ounces Fontina cheese, cubed
For Dippers:
  • 1 loaf French or sourdough bread, cut into bite-size pieces
  • broccoli florets
  • cauliflower
  • carrots
  • apples
  • mushrooms
  • yellow squash
  • zucchini
  • cucumber
  • green onions

Rub the halved garlic on the sides if the fondue pot, set aside garlic and chop for addition later. Melt the butter in fondue pot over medium-low heat. Whisk in the flour. Constantly whisk for 1 minute or until the mixture is smooth and begins to bubble. Slowly whisk in the Sherry. Whisk in the milk. Bring the sauce to a gentle simmer.

Slowly add the cheese, stirring until all the cheese has melted and the mixture is smooth (you may need to add a little more milk if the mixture becomes too thick). Season the fondue to taste with the garlic.Transfer the fondue pot over a canned heat burner to keep it warm. Enjoy!

Cheese Fondue (simple cheddar)


Again, my kitchen lighting stinks. No real photos to give, but that is the type of fondue pot I own. This cheddar cheese fondue is one of the cheaper versions to make and really easy. It takes about 5 minutes to make and doesn't take fancy cheese. This is also from the Melting Pot cookbook, with some changes.


Cheddar Fondue
Serves 4
You will need:


  • 3 cups shredded cheddar cheese (plus more if needed)
  • 3 T all-purpose flour
  • 1 cup hard cider (Strongbow brand recommended)
  • 2 tsp finely chopped shallots
  • 2 tsp dry mustard
  • 1 tsp freshly ground pepper
  • 2 T craisens (optional)
  • 2 tsp crushed walnuts (optional)

Recommended dippers :

  • 1 loaf French or sourdough bread, cut into bite-size pieces
  • broccoli florets
  • cauliflower
  • carrots
  • apples
  • mushrooms
  • yellow squash
  • zucchini
  • cucumber
  • green onions

Toss the cheese with the flour in a bowl. Set aside. Heat fondue pot over high heat. Reduce heat to medium and pour in the hard cider. Stir in the shallots, mustard and craisens (if using). Stir with a fork or whisk, constantly for 30 seconds.

Add in half of the cheese and cook until the cheese is melted, stirring constantly. Add the remaining cheese a small amount at a time, stirring constantly. After all the cheese is melted add in the pepper. Keep fondue warm over low heat and garnish with nuts if desired.

Chocolate Fondue


I love love love all things fondue! If I have had you over for dinner, you have probably had fondue. This lovely recipe comes from the Melting Pot cookbook. It is a very basic recipe for chocolate fondue, but very yummy. An aside, I hate the lighting in my kitchen at night, so the photo is borrowed until I can get a better photo.

Original Chocolate Fondue
Serves 4
You will need:
  • 8 oz milk chocolate finely chopped
  • 2T heavy cream (plus more if needed)
  • 2T chunky peanut butter

Combine the chocolate and cream in your fondue pot (or double boiler if your pot can't go on the stove) Heat until the chocolate is melted, stirring constantly. Be careful not to let the chocolate burn. Add in the peanut butter and stir until blended. Add in more cream as needed if it is too thick. Keep fondue warm over medium heat.

Thursday, February 12, 2009

Chocolate Panini


I am always looking for a quick easy dessert to make after dinner to satiate my husband's need for chocolate. These paninis might seem a bit strange, but they are actually quite tasty and very quick to make.

Chocolate Panini
Serves 2 to 4
You will need:
  • 4 slices of whole grain white bread
  • 2 ounces of semi-sweet chocolate, chopped

Form two sandwiches with the bread and the chocolate. Transfer to a hot panini press or a George Forman type grill and cook until the bread is golden and the chocolate has melted. It will take about 2 to 3 minutes. You could also make these in on a hot skillet and flip once, pressing down frequently.

*The first time I made these, I made just one sandwich and we split it.

Chocolate Pecan Pie


In the pie class we took for Thanksgiving we also made this delicious Chocolate Pecan Pie. I am a huge fan of pecan pie and an even bigger fan of chocolate, when the two are combined it is quite the delicious treat.

Chocolate Pecan Pie
Yields 6 servings
You will need:

For the pie crust -
  • 1 cup plus 2T of all-purpose flour
  • 1/2tsp kosher salt
  • 1tsp sugar
  • 1/2 cup (one stick) cold unsalted butter, cut into 8 pieces
  • ~3 T ice water

For the filling -

  • 1/2 cup (one stick) unsalted butter
  • 2 oz. semi-sweet chocolate chips
  • 1 cup sugar
  • 2 large eggs
  • 1T Bourbon
  • 1tsp vanilla bean paste
  • 1/4 tsp kosher salt
  • 1 1/2 cups chopped pecans

For the crust - Combine flour, salt, and sugar in the container of a food processor. Pulse once or twice to mix. Add the butter, pulse until the butter and flour are blended and the mixture looks like cornmeal, about 10 to 15 seconds. If you don't have a food processor, we did this all by hand. Just mix the butter in with your hands until you reach the desired consistency.

Sprinkle 3T COLD water over the dough and pulse just until the dough comes together. If the mixture seems too dry, add more water a tsp at a time. Wrap in plastic, flatten into a small disk, and freeze for 10 minutes (or refrigerate for 30 minutes), this will ease the rolling.

Roll out, with a little extra flour to prevent sticking, until almost 10 inches in diameter. It will need to be equal or less then 1/4 inch thickness. Transfer to a pie plate, form edges, and then freeze for about 10 minutes. Prick the crust all over with a fork when you are ready to fill it.

Preheat the oven to 350 degrees F. Place a baking sheet in the oven.

For the filling - Stir butter and chocolate in a heavy saucepan over low heat until melted and smooth. Remove from heat and cool for 10 minutes.

Whisk sugar and eggs in a medium bowl to blend. Whisk in the chocolate mixture, then Bourbon, vanilla, and salt. Stir in the pecans (filling will be very thick). Spoon filling into crust. Place pie on baking sheet in the oven.

Bake until edges of filling puff and begin to crack and center is set. About 30 to 45 minutes. Transfer pie to rack and cool completely.

***NOTE: Pie is not done until the pie looks dry and caramelized. If the pie still looks wet it is not done.***